Chapter 2: Understanding and Setting Up VirtualBox
Understanding VirtualBox.
- Section 1: Introduction to VirtualBox
- Section 2: How VirtualBox Differs from Dedicated Systems like ESXi or Proxmox
- Section 3: Getting VirtualBox
- Section 4: Getting Ubuntu Linux
- Section 5: Lets Build a VM
- Section 6: Configuring the VM
Section 1: Introduction to VirtualBox
2.1. What is VirtualBox?
VirtualBox is an open-source virtualization software developed by Oracle that allows you to run multiple operating systems simultaneously on a single physical machine. It creates a virtual environment where you can install and operate a guest operating system as if it were a separate physical machine. This environment is isolated from your main operating system, providing a safe space to experiment with different configurations, software, and setups without affecting your host system.
Overview of VirtualBox as a Virtualization Tool
VirtualBox operates by simulating the hardware that an operating system would normally run on. When you create a virtual machine (VM) within VirtualBox, it allocates a portion of your system's resources, such as CPU, memory, and storage, to the VM. The guest operating system running on this VM believes it is working on a real machine, while in reality, it's running within the confines of the virtual environment provided by VirtualBox.
Key Features and Benefits of Using VirtualBox for Development and Testing
-
Cross-Platform Compatibility:
- VirtualBox is compatible with a wide range of host operating systems, including Windows, macOS, Linux, and Solaris. This flexibility makes it an ideal choice for developers working in diverse environments.
-
Support for Multiple Guest OSes:
- You can install and run various operating systems as guests on VirtualBox, including different versions of Linux, Windows, and BSD. This is particularly useful for testing software in different OS environments or learning new systems without needing additional hardware.
-
Snapshot and Restore:
- VirtualBox allows you to take snapshots of a VM at any point in time. If something goes wrong during testing or development, you can easily revert to a previous snapshot, saving time and effort in setting up the environment again.
-
Isolation and Safety:
- Since VMs are isolated from the host system, any changes made within the VM do not affect the host OS. This isolation provides a secure environment for testing potentially unstable or risky configurations, software, or code.
-
Resource Management:
- VirtualBox allows you to control the amount of resources allocated to each VM, such as CPU cores, memory, and disk space. This helps in optimizing performance while ensuring that the host system remains responsive.
-
Networking Flexibility:
- VirtualBox offers various networking modes (e.g., NAT, Bridged, Host-Only) that allow VMs to interact with each other, with the host, or with external networks. This makes it ideal for simulating network environments and testing networking configurations.
-
Open Source and Community Support:
- As an open-source tool, VirtualBox is free to use and benefits from a large community of users and contributors. This means frequent updates, a wealth of tutorials, and a strong support network to help troubleshoot issues.
-
Ease of Use:
- VirtualBox features a user-friendly interface that makes it easy to create and manage virtual machines, even for those who are new to virtualization.
By providing a flexible, safe, and efficient environment, VirtualBox becomes an essential tool for developers, system administrators, and IT professionals. Whether you're testing new software, learning about different operating systems, or setting up isolated environments for development, VirtualBox offers a powerful solution to meet your needs.
Section 2: How VirtualBox Differs from Dedicated Systems like ESXi or Proxmox
When diving into virtualization, it’s important to understand the different options out there and why we might choose one over the other. VirtualBox, for instance, is quite different from dedicated systems like ESXi or Proxmox. Let’s break down those differences and explain why VirtualBox is a great starting point for this project.
Key Differences Between VirtualBox and Dedicated Systems:
-
Hypervisor Type:
- VirtualBox (Type 2 Hypervisor):
- VirtualBox runs on top of your existing operating system, whether it’s Windows, macOS, or Linux. This makes it easy to get started without making any changes to your hardware setup.
- ESXi and Proxmox (Type 1 Hypervisors):
- On the other hand, ESXi and Proxmox are what we call type 1 hypervisors. They run directly on the physical hardware, without needing a host OS in between. This setup can offer better performance, but it’s a bit more complex to set up and manage.
- VirtualBox (Type 2 Hypervisor):
-
Performance:
- VirtualBox:
- Because VirtualBox runs on top of another operating system, there’s a little bit of overhead, which can mean slightly lower performance. But for development, testing, or smaller projects, this isn’t usually a big issue.
- ESXi and Proxmox:
- These systems are designed for performance. They have direct access to the hardware, which can be crucial in a production environment where you need every bit of power and efficiency.
- VirtualBox:
-
Resource Management:
- VirtualBox:
- VirtualBox shares your computer’s resources with the host OS, so there’s a bit of give and take. It’s perfect for projects where you don’t need to squeeze every last drop of performance out of your hardware.
- ESXi and Proxmox:
- These platforms let you manage resources more efficiently, directly from the hardware. They’re built to handle heavy loads and multiple VMs in large-scale environments.
- VirtualBox:
-
Scalability:
- VirtualBox:
- VirtualBox is really handy for smaller setups or when you’re just getting started. However, it might feel a bit limited if you try to manage a large number of VMs.
- ESXi and Proxmox:
- These systems are designed to scale. If you’re running a data center or managing dozens of VMs, they offer the tools you need to keep everything running smoothly.
- VirtualBox:
-
Features and Functionality:
- VirtualBox:
- VirtualBox covers the basics very well. It’s got everything you need to create, manage, and experiment with VMs, making it a great tool for learning and development.
- ESXi and Proxmox:
- If you need advanced features like clustering, high availability, or live migration of VMs, that’s where ESXi and Proxmox shine. They’re packed with enterprise-grade features that go beyond what VirtualBox offers.
- VirtualBox:
-
Ease of Use:
- VirtualBox:
- One of the biggest reasons we’re using VirtualBox for this project is its simplicity. It’s very user-friendly, making it accessible to a wide audience, even if you’re new to virtualization.
- ESXi and Proxmox:
- These platforms are powerful, but they also come with a steeper learning curve. They’re great for IT professionals who need robust tools for managing complex environments.
- VirtualBox:
-
Use Cases:
- VirtualBox:
- VirtualBox is ideal for anyone who needs to set up a quick, isolated environment for development, testing, or learning. It’s flexible and doesn’t require any special hardware.
- ESXi and Proxmox:
- These systems are often used in larger, more critical environments. They’re the go-to choice for production servers, large-scale deployments, and when uptime and reliability are paramount.
- VirtualBox:
-
Cost:
- VirtualBox:
- VirtualBox is free and open-source, which is another reason we’re using it. You can get started without worrying about licensing costs or subscriptions.
- ESXi and Proxmox:
- ESXi has a free version, but the full feature set requires a license, which can be expensive. Proxmox is also open-source, with an optional subscription for support, making it a bit more accessible but still more complex than VirtualBox.
- VirtualBox:
Why We Chose VirtualBox
For this project, we’ve chosen VirtualBox because it’s more accessible to a wider audience. Whether you’re a seasoned IT professional or just getting your feet wet with virtualization, VirtualBox offers a simple, straightforward way to dive in without the complexity or cost of more advanced systems. It’s perfect for experimenting, learning, and building a solid foundation before moving on to more complex setups like ESXi or Proxmox if needed.
In the next steps, we’ll walk through setting up your first virtual machine in VirtualBox, which will serve as the base for building our LOGG stack.
Section 3: Getting VirtualBox
VirtualBox is a well-established virtualization tool that has been around since 2007, when it was first released by Innotek GmbH. Over the years, it has become one of the most popular and widely used virtualization platforms, thanks to its combination of robust features, ease of use, and, importantly, its open-source nature. In 2010, Oracle acquired VirtualBox, continuing to develop and support it, making it a reliable choice for both personal and professional use.
One of the most appealing aspects of VirtualBox is its cross-platform compatibility. Whether you're running Windows, macOS, Linux, or even Solaris, VirtualBox will work seamlessly on your system. This means you can follow along with this project no matter what kind of workstation you're using, making it accessible to a wide audience.
To get started with VirtualBox, you'll need to download it from the official VirtualBox website. Here’s the link: Download VirtualBox.
Once you're on the site, choose the download option that matches your operating system. VirtualBox offers straightforward installation packages for different platforms, so just select the one that fits your setup.
Installation Instructions:
-
For Windows Users:
- Download the Windows installer from the link above.
- Run the installer and follow the prompts. The default settings work fine for most users.
- After the installation is complete, you can launch VirtualBox from the Start menu or desktop shortcut.
-
For macOS Users:
- Download the macOS installer (.dmg file) from the VirtualBox website.
- Open the downloaded file and drag the VirtualBox icon to your Applications folder.
- You might need to allow the installation from System Preferences under Security & Privacy, especially if your system is configured to only allow apps from the App Store.
-
For Linux Users:
- Most Linux distributions include VirtualBox in their repositories. You can install it using your package manager, or download the latest version directly from the VirtualBox website.
- For example, on Ubuntu, you can use the following commands in the terminal:
-
sudo apt update
sudo apt install virtualbox
-
- If you're downloading it from the website, follow the provided instructions for your specific distribution.
After installing VirtualBox, you'll be ready to create your first virtual machine and begin exploring the LOGG stack setup. The beauty of VirtualBox is that you can do this on almost any workstation, regardless of the operating system, making it an incredibly versatile tool for learning and development.
Section 4: Getting Ubuntu Linux
When choosing an operating system for our virtual machine, I selected Ubuntu for several reasons. Ubuntu has been my Linux server of choice for over a decade due to its reliability, stability, and ease of use. It provides a secure and efficient environment, making it ideal for a wide range of server applications. Additionally, Ubuntu’s strong community support and comprehensive documentation ensure that you have access to the tools and resources you need.
To get started, you'll need to download the Ubuntu Server ISO file. You can find the latest version of Ubuntu Server at the following link:
Once you've downloaded the ISO file, I recommend saving it in an organized location on your computer. Consider creating a dedicated folder for operating system ISOs, such as OS_ISOs, where you can store this and any future ISO files. This will help keep your files organized and easily accessible for future use.
Once you have the ISO downloaded we are ready to move on to setting up Virtualbox and getting the LOGG stack on the road.
Section 5: Lets Build a VM
Why Are We Building a VM?
A virtual machine (VM) is essentially a computer within your computer, running on top of your existing operating system. It allows you to create an isolated environment where you can install and run different operating systems and software without affecting your main system. For our LOGG stack project, using a VM gives us the flexibility to experiment and configure each component in a controlled space. It’s like having a sandbox where you can build, test, and tweak your setup without any risk to your primary machine. By allocating specific resources like CPU, memory, and storage, we ensure that the VM can efficiently handle the tasks we'll throw at it, all while keeping your main system free from potential conflicts.
Lets Get Started
At this point, you should have VirtualBox installed on your system. Upon launching the application, you will be presented with an interface similar to the one shown below. If you are already familiar with VirtualBox, you can proceed with the following steps. Our goal is to create a virtual machine configured with 4 processor cores, 4GB of RAM, and 40GB of hard drive space.
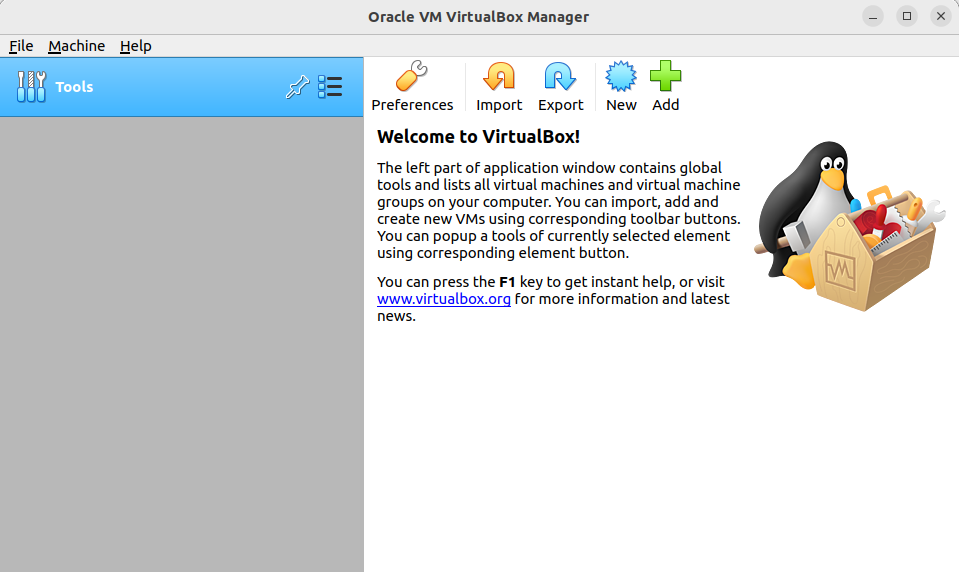
To get started, here we will click new. Which will present you with the screen below.

Let's begin by configuring our virtual machine. For this project, we'll name the VM LOGG-Stack. In the Machine Folder field, set the directory to LOGG-Stack-VM to keep your files organized. In the Type dropdown menu, select Linux, and in the Version dropdown, choose Ubuntu (64-bit). Next, set the memory allocation to 4096 MB (which is roughly 4 GB of RAM). You can either type this value directly or use the slider to adjust it. Once these settings are correctly configured, the setup screen should resemble the one shown below.
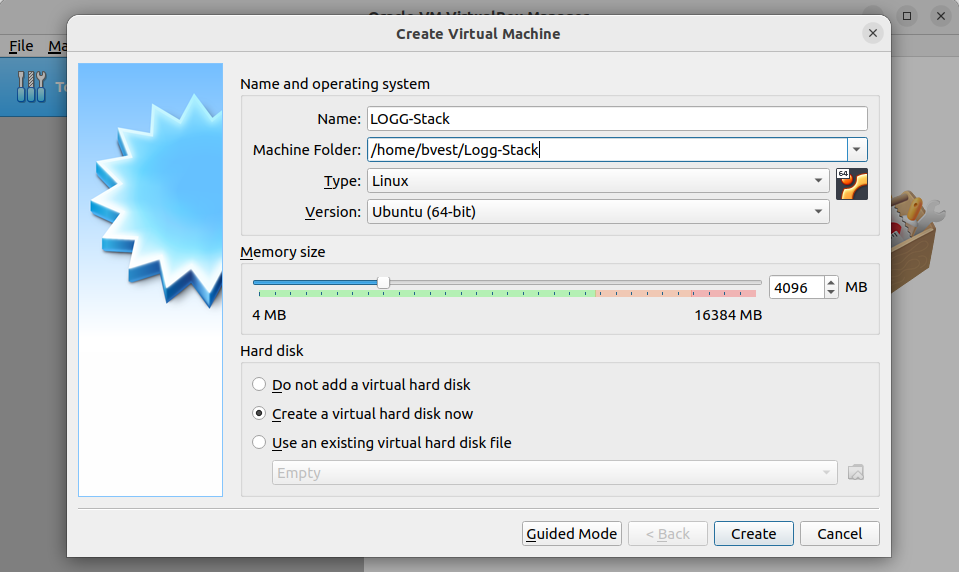
When you have all of this setup click the Create button and lets move on to the next steps.
After clicking "Create," you will be directed to the virtual hard disk creation screen. This screen presents several options, most of which can be left at their default settings. However, it's important to allocate more space for this VM than the default 10GB. To do this, either type in 40GB or use the slider to adjust the disk size accordingly, as shown below.
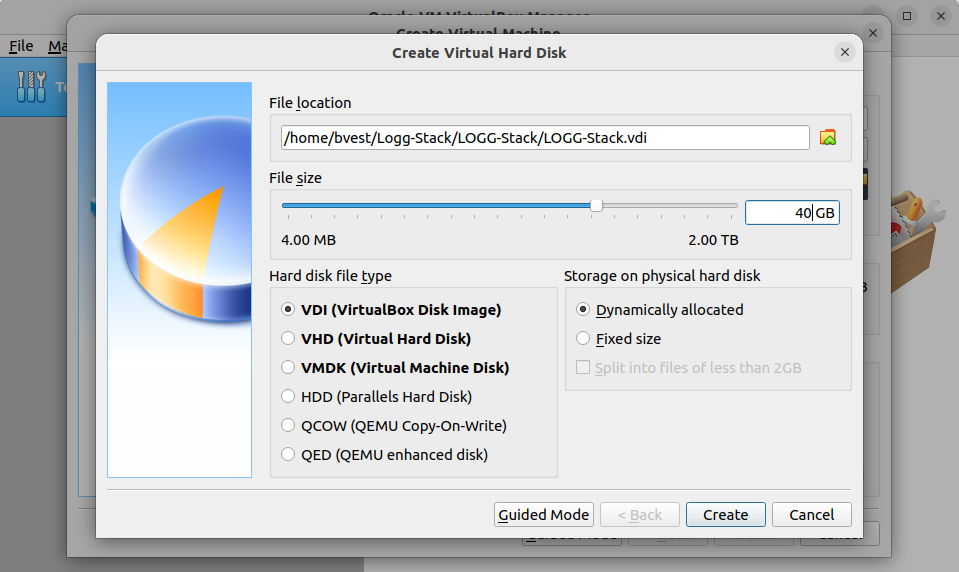
Once you click "Create," the setup process will complete fairly quickly, and you'll be returned to the main VirtualBox interface. You should now see our newly created VM, LOGG-Stack, listed and ready for launch. The setup process is straightforward, and your virtual machine is now prepared for the next steps in our project.
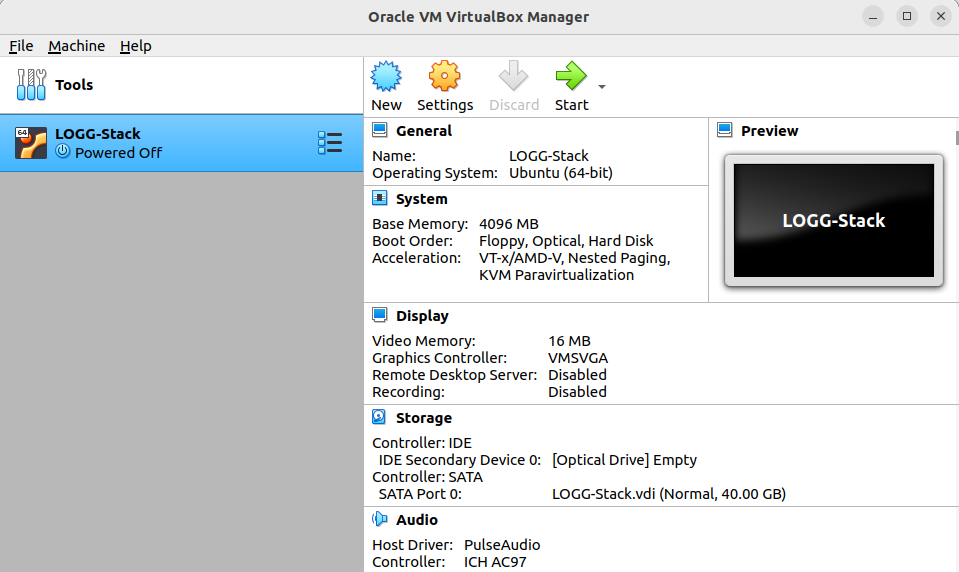
Although our virtual machine is now set up, we're not quite ready to launch it just yet. Before we proceed, it's important to configure the VM to ensure it meets the specific requirements for our project. Let's move on to Section 6, where we'll walk through the configuration steps necessary to optimize the VM.
Section 6: Configuring the VM
Introduction
While the initial setup guides us through the basic process of building our virtual machine, there are a couple of additional adjustments we need to make to ensure it’s configured correctly for our project. Specifically, we need to adjust the number of CPU cores allocated to the VM and mount the ISO file that will install our operating system. These steps are crucial to optimizing performance and preparing the environment for the tasks ahead. Let's dive into these configurations to get our VM fully ready for use.
Why Do We need This?
Configuring the VM with 4 processors and 4096 MB of memory is a critical step to ensure the LOGG stack performs optimally. In data processing tasks like these, having more CPU cores or threads is often more important than raw processor speed. This is because the stack’s components, particularly OpenSearch and Logstash, are designed to handle large volumes of data by parallelizing tasks across multiple cores.
OpenSearch and Logstash are both built on Java, which manages memory through the Java Virtual Machine (JVM). JVM-based applications benefit from multiple cores as they can distribute processing loads across threads, improving performance and responsiveness. However, they also require sufficient memory to manage data efficiently. OpenSearch uses memory to store index data and query results, while Logstash needs memory to buffer and process logs in real-time. With only 4 cores, your system will be able to manage basic tasks, but as data loads increase, these resources may become a bottleneck. Understanding this allows you to anticipate the system’s behavior and plan for potential upgrades as your data processing needs grow.
And then there's Linux—the trusty OS that’s about to become the backbone of our entire operation. Remember that big ISO we downloaded earlier? Yep, it’s finally time to put it to work. Linux is like the dependable engine under the hood; it quietly powers everything we do, from managing resources to keeping our stack running smoothly. Without it, our processors and memory would be sitting idle, and our entire setup would be more of a concept than a functioning system. So yes, we definitely need it, and it’s about to earn its keep.
Lets Get Started
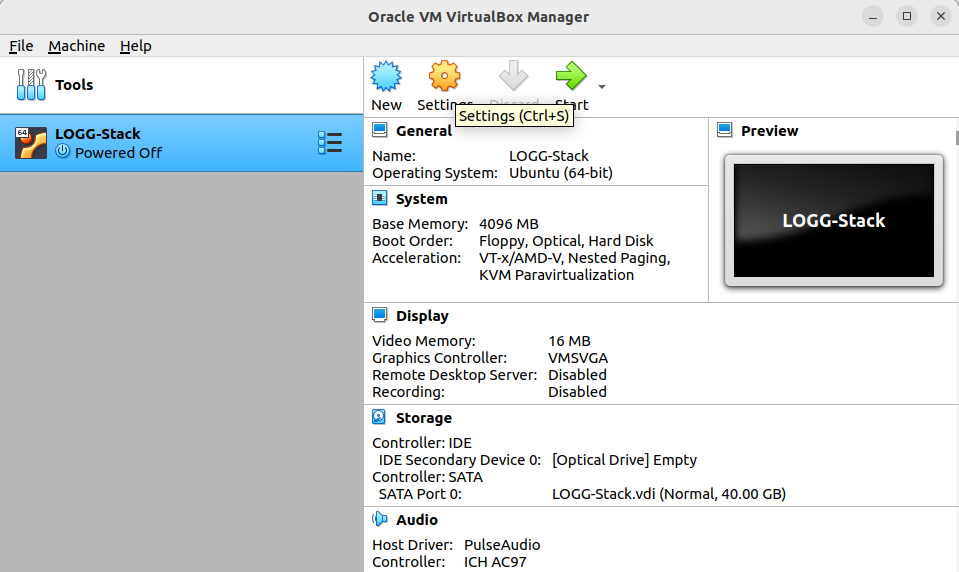
Clicking Settings will bring up the screen below.

The adjustments we need to make can be found under the System icon in the VirtualBox settings. Specifically, we'll focus on the Processor tab, where we can configure the number of CPU cores allocated to our virtual machine. The following section will guide you through these steps, as illustrated below.
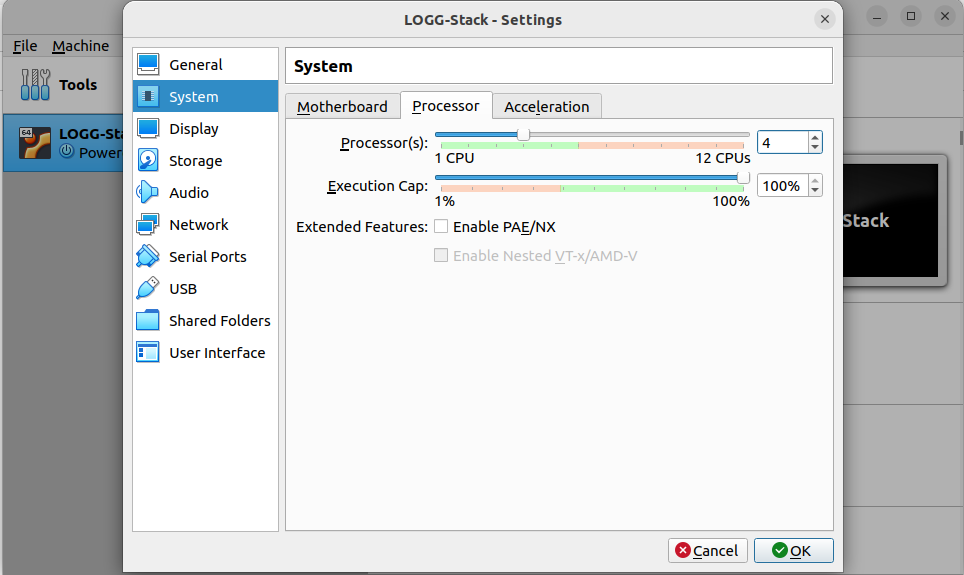
Adjust the number of CPU cores by either typing the value directly or using the slider. For this project, we're aiming to allocate 4 processor cores to ensure optimal performance. If your system has fewer cores available, you can reduce this to 2 cores, but 4 cores will provide the best results for our needs.
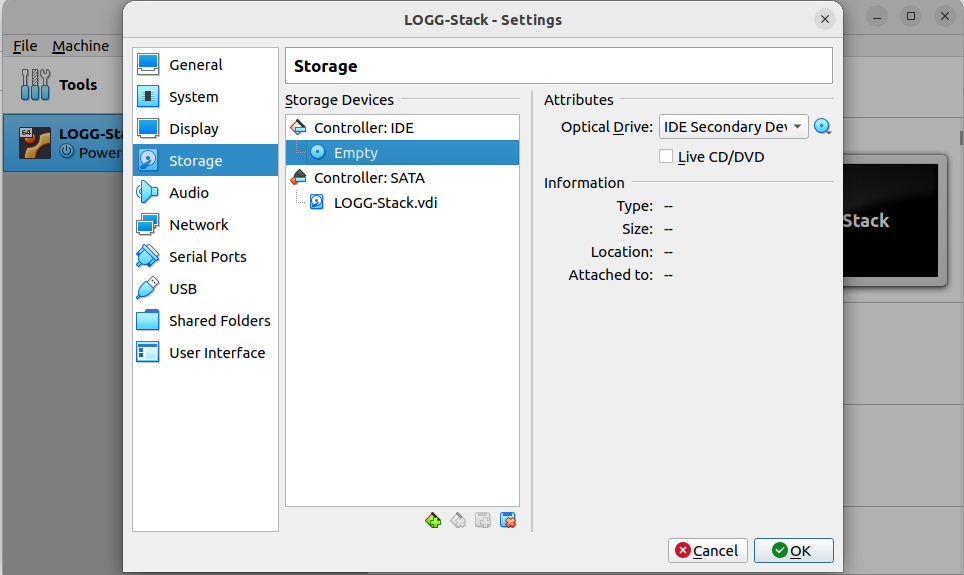
Once you're in the Storage settings, select the Empty disk option under Controller: IDE. This represents the virtual DVD drive for our VM, where we'll mount the Ubuntu ISO. Click on the small blue disk icon next to IDE Secondary Device and choose "Choose a Disk File" from the dropdown menu. This action will open a file selection window. While the appearance of this window may vary depending on your operating system, simply locate and select the Ubuntu ISO file that we downloaded earlier.
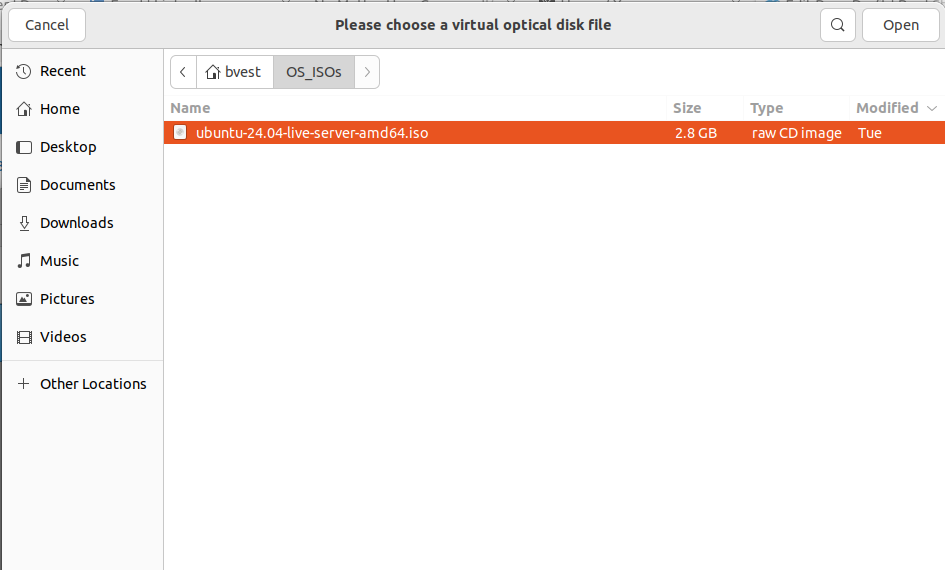
After loading the file you will be returned to the setting screen shown below.
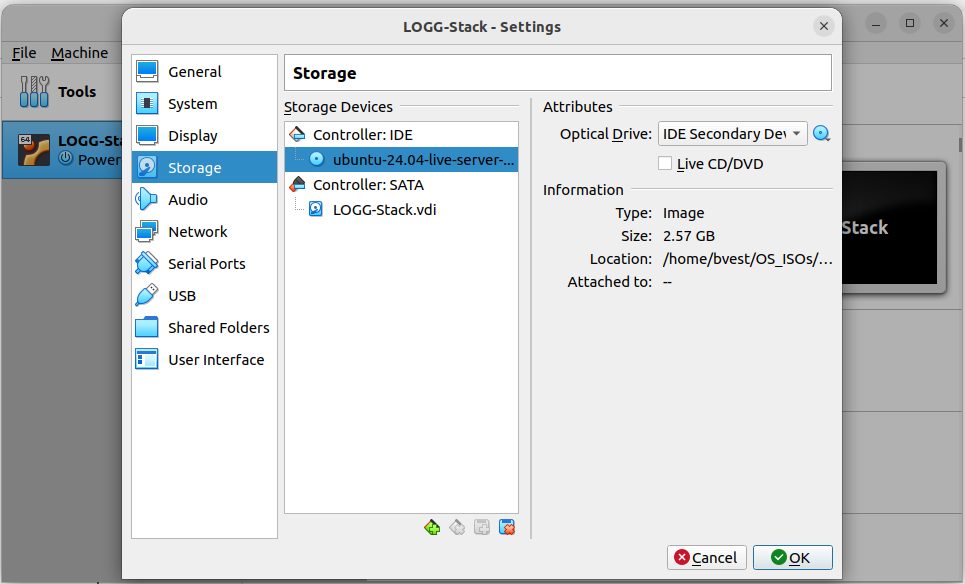
From here click OK and you will be returned back to the main virtualbox screen. You can verify your changes here in the window on the right.
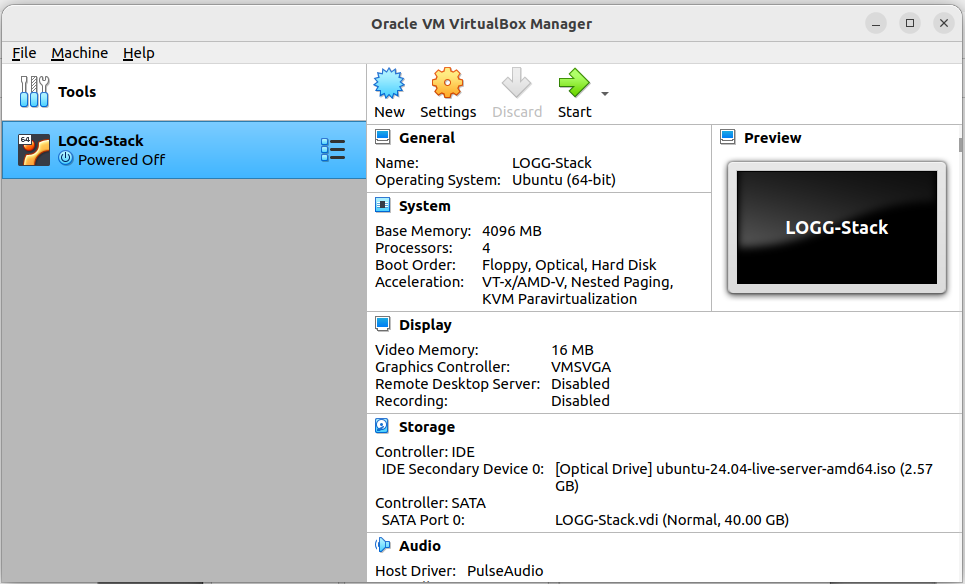
At this point, you should see that the VM is configured with 4 processors, 4096 MB of Base Memory, and that the IDE Secondary Device 0 is now set to our Linux ISO. With these configurations in place, we're ready to start the VM and begin the installation of our operating system. Follow along in Chapter 3: Installing Linux, where we will walk through the installation process step by step and explain the various options available.